For simple compositions with bright sky on top and dark foreground on bottom, the traditional solution is to put a "graduated ND (Neutral Density) filter" on your camera lens. These filters are dark on top and clear on bottom, with a little gradient in the middle to smooth the transition. They let in less light on the top so that you can expose for the foreground without losing details in the sky.
The same effect can also be achieved using some Photoshop wizardry.
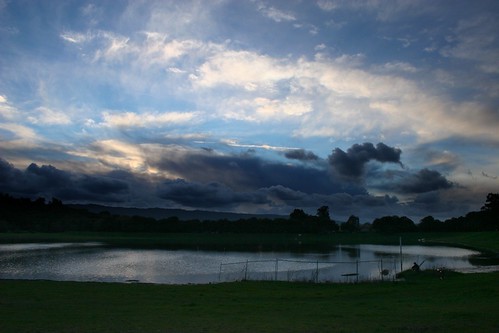
I took this photo in front of "Lake" Lagunita behind Stanford soon after we got our camera.

The sky and clouds are really stunning, but the foreground of the image is too dark for you to make out any details.
To apply the digital ND effect, I followed this great tutorial, written for the GIMP (GNU Image Manipulation Program), an open source alternative to Photoshop. The tutorial was well written and easy to follow, so I'm not going to re-write all of the details here. I think my post here should be helpful, though, in seeing the major steps and the overall effect.
I haven't thrown down the dough yet for Photoshop, so the GIMP is a good alternative in the meantime. If you don't have Photoshop, I highly recommend downloading the GIMP. It's interface is very similar to Photoshop, so any concepts or techniques you learn with the GIMP will translate easily to Photoshop down the line.
This effect takes advantage of the fundamental editing concept of layers and layer masks. I didn't have a good handle on these concepts until working on this image, but now they make perfect sense. I think this filter technique is a really good way to solidify your understanding of layers and layer masks.
Think of layers as a stack of transparent slides. The final image you see is what you would see if look down at the top of the stack. The idea is that each slide, or layer, will contribute something different to the final image. Separating it into layers means that you can make different adjustments to different parts of the image. You then apply layer masks to control the transparency of different parts of each layer. In other words, the layer masks let you specify which part of each layer will contribute to the final image.
Even if you don't go through the whole tutorial, I recommend reading through the section in the beginning "About Layers and Layer Masks". He explains it well and has some great images to demonstrate the concepts.
For this technique, we're going to duplicate the image so that we have two layers. We'll adjust one layer to make the ground look good, and the other layer to make the sky look good. We'll then apply a layer mask so that the sky layer only contributes its sky and the ground layer only contributes its ground.
I first created a layer for the ground and adjusted it to bring out the details in the foreground. To lighten the foreground, I adjusted the midpoint slider in the levels tool. The midpoint slider is a good way to lighten or darken an image because it does it without clipping off any parts of the histogram, which would cause you to lose detail.

You can see why the graduated filter is necessary here; lightening the image made the foreground look better, but it washed out the sky.

Next I selected the sky layer to punch up the clouds a bit. I used the midpoint slider in levels again.

This made the sky look even more stunning, but made the foreground even darker.
Note that in order to see the sky layer, I had to unclick the eye icon next to the Foreground layer. Currently the Foreground layer is completely opaque, so unless I hide it I can't see anything from the layer below it.

Now that I have my foreground looking how I want in the Foreground layer, and the sky looking how I want it in the Sky layer, it's time to combine them using a layer mask.
You right click on the layer to add a layer mask to it. Select the layer mask in the layers palette, then use the gradient tool to actually create the mask. You create the gradient by drawing a line on the image.

This mask modifies the top layer so that everything above the beginning (top) of the line will be 100% transparent, and everything below the end (bottom) of the line will be 100% opaque. The gradient will be along the line itself to create a smooth transition between the images in the two layers.
If you hide the bottom layer, you can see the effect of the mask clearly. The checkered areas represent transparent parts of the upper layer.

Once you make both layers visible, you have your combined image!
Here's the original again for comparison:
And that's it! If you're new to Photoshop, I think this is a really good beginning technique. It's helped me get a good grasp on the basics of working with layers, and made me much more confident working with the GIMP in general.

This would be really helpful...:) Thanks
ReplyDeleteMy step-dad just told me about GIMP. I'll download it today! I've been using picnik.com, which is fun, but much less technical, I'm assuming. Thanks again for your great insight.
ReplyDeleteI did reply to your comments about my swan. Hope you've had a chance to check it out. :) How's your trigger finger?
The finger's doing good; it's not bothering me much anymore. I'm hoping the doctor will tell me the splint can come off this week.
ReplyDeleteThe GIMP is definitely worth a look. Did you say you were taking a Photoshop class? I think you'll find the two are relatively similar. The biggest gripe I hear people have with the GIMP is that it doesn't have "Adjustment Layers" like Photoshop.
Adjustment layers allow you to make an adjustment, like boosting saturation, and that adjustment appears in the layer palette as a separate layer. This allows you to click on the adjustment later and re-adjust the saturation. it also allows you to click it on and off, and apply masks to it I think. It's a pretty big hole in the GIMP's features, but you can work around it. I basically took notes on all of the adjustments I made so that I could go back and redo them later. A little painful, but not as bad as it might sound.
At least not as painful as your finger, right? :)
ReplyDeleteI actually logged on to your blog to tell you about these wedding photogs in your neighborhood... well in Santa Barbara anyway.
http://austindara.com/blog/
They are a married couple. My brother (in L.A.) is friends with Austin's little brother. That's how I discovered Austin & Dara. They are really talented portrait photographers, well photographers in general, so I thought they might be of inspiration to you as well. And who knows... maybe you'll run across them someday, if you haven't already.