Wednesday, May 26, 2010

The Lizard That Swallowed The Sea


My friend Wyatt and I headed up to Lizard's Mouth on Saturday morning. Sunrise was ridiculously early, so we didn't get up there until about an hour after. So the light was decent, but not amazing. It was a really clear day, though, with a beautiful view of the city and the islands.

This was shot from a pretty similar perspective to this image, with a different focal length obviously. I was probably standing on the next rock over :).

Lizard's mouth is a great spot. It's almost a shame, though, how easy it is to get to. I think Wyatt and I were both feeling like we would have enjoyed more of a hike that morning.

This is a handheld 3 exposure HDR at -1 1/3ev, 0ev, and +1 1/3ev. Here is the original, unedited, 0ev exposure


Throw a photographer into any scene and it instantly gains some interest for me. Thanks for livening up my image, Wyatt :)

The view from Lizard's Mouth on a clear day like this one is fantastic. This is overlooking Goleta; Wyatt's standing in front of the view of the airport, and the UCSB campus is to the left of his head. The big island on the horizon is Santa Cruz Island.

I tried a panorama from up there but totally botched it. Good thing I lugged my tripod out with me :). Maybe another time.

The original, unedited image.

Tuesday, May 25, 2010

Harbor at Night

I'm changing things up a bit with how I share photos on this blog. Basically, I've decided that Flickr is a better place for me to try and develop community and share my work (after all, that's what it's designed for!), so I'm planning to put my primary focus there.

That said, I know that my blog (and the fact that you can subscribe to it) is how most of my "real life" friends get to see my work, so, I'll continue to post all of my photos here, and the descriptions will just be identical to whatever I write on Flickr.

Also, I'm still very passionate about sharing what I learn about photography, and I think this blog is still the best medium for lengthy discussions of a given topic. So it will continue to be more than just a clone of my Flickr photostream. If I write an 'article' on the blog, I'll just link to it in the description of one of the photos on Flickr.

Up until now the role of my photostream versus my blog has been a little fuzzy, and I'd often write slightly different things in each place, and occasionally link the Flickr photo back to the blog post. I'm hoping this will clean things up.

If you follow my work on Flickr, you can just follow it there and you won't miss anything. If you follow my blog, you can just follow my blog and you still won't miss anything that way, either.

So, to get things started, here are a couple recent photos with their descriptions from my photostream.

This was my first outing with my new tripod--a set of Manfrotto 055XPROB legs and a PhotoClam PC-33NS ballhead. Up until now I've been making do with a really cheap ($30?) tripod that came bundled with a camcorder.

It turned out the biggest benefit I saw with the new tripod had to do with composition. Because the legs are so tall, I can stand up very comfortably while looking through the viewfinder. I see now, too, why ballheads are the preferred choice for landscapes--the ballhead made it very easy to adjust the framing. All of that added up to me being able to be a lot more patient in getting the scene composed well.

The fact that I can trust my camera on it enough to step away during a 2 minute exposure is nice, too. :)

Another shot from the harbor that night. I really liked the light on the inside of the sea wall.

Just upgraded to a Flickr Pro account today, woohoo!

Friday, May 14, 2010

Thousand Steps

8 sec at f/16 and 18mm

Towards the end of the day on Wednesday there were some really cool clouds in the sky, it looked promising for a sunset. I checked the tide tables and saw that there was a really high tide right at sunset, the tide was just over 5 feet. When the tide is that high, there are a lot of places around Santa Barbara where the beach completely disappears and the waves crash against the cliffs. A fun side effect of this is that some of these beaches have stairs that lead down to them, and with that tide height the stairs lead straight into the waves.

There's a set of stairs nearby called Thousand Steps (it is a lot of steps, but the name is an exaggeration--there's nowhere close to a thousand) that I've been wanting to shoot under these conditions.

This was a nice quick trip; I already had a clear idea of the shot I wanted, and there weren't many other options to try. I got there, set up, took a handful of shots, and was out of there pretty quickly.

This was one of my first outings with my new tripod--Manfrotto 055XPROB legs with a PhotoClam PC-33NS ball head. I'll gush about this tripod more in another post, but I have to say the biggest benefit I'm finding with it is that it makes is much easier to compose my shots. I'm able to comfortably and patiently assess the composition and make fine adjustments to it. With my old, cheap tripod, I'd tend to give up a bit because of the painful difficulty of getting it positioned just right.

One of the things I've learned about recently, which was relevant on this outing, is the problem of "barrel distortion". I had read this term a number of times, but never bothered to look it up until recently. Barrel distortion is a problem with wide-angle lenses which causes the scene to bend slightly away from the center at the lens's widest angle.

This becomes a problem when you have a clean, straight horizon in your shot, as it will appear curved. The solution is to not shoot at the absolute widest angle of the lens if your scene has a strong horizon line.

I took my first photos at 18mm, my kit lens's shortest focal length. With the image preview on the back of my camera, I zoomed in and saw this curve on the horizon.


It's clearer when the horizon is right up against the frame.


Not so bad, really, but I ended up deciding on a square cropping of just the stairs anyway. I really liked the texture of the water in the first picture and wanted to bring the focus to that and the stairs.

Wednesday, May 12, 2010

Sunset at Hendry's

.8 sec at 18mm, f/16, and ISO 100

This was a great trip, I came back with a ton of exciting photos that will probably take me months to process. This was one of the best.

The trip was also made extra awesome by a special companion.

Logan and dad at Hendry's beach

I've found it really hard over the past year to be flexible enough to make it to the beach when the sunset is looking promising. Things have gotten a little more relaxed lately, though, (now that "sunset season" in Santa Barbara is over!) and I think I should be able to steal away from time to time for some sunset photography. One idea Jess had suggested was for me to try bringing Logan along, since he's old enough now to have a little fun at the beach. Initially I was worried that it wouldn't work because I'd never have enough time to set up a shot before I had to pick up the camera and chase after him. He can't really get into much trouble out there, though, so I think it could actually work in general.

It turned out to be kind of a terrible day to bring him... It was really cold and windy, and the tide was pretty high. I bundled him up as best I could, and I ended up setting him down on some rocks in a little alcove (you can see it on the right side of the photo) that mostly kept him protected from the wind. Someone probably would have called child protective services on me if they saw us, but the beach was completely cleared out by the weather :)

You're a trooper buddy!

Editing this one was rough. It was a promising photo so the stakes were high, and I kept second-guessing myself. I knew that I had to get it done in one sitting (or else I'd let it sit "almost done" forever!), so I brewed some tea, put some music on, and cranked away for a good two hours straight. Below are the before and after.


I'm still trying to perfect the technique for this type of photo. A lot of photographers use graduated filters on their lenses in order to expose for the foreground without blowing out the sky. Filters can be expensive, though, and the horizon is rarely a straight line all the way across (for example, the cliffs to the right in this one), so my hope has been to use clever editing to pull it off.

In theory, I want one exposure where the foreground is well-exposed and the water is how I want it, and then I want a second exposure where the sky is exposed well, and I can blend those together. I've yet to pull this off, though. I think a big part of it is just that I get too excited when I'm out there and don't give the technique enough thought. The other problem is that the sky and foreground can't be too far apart in exposure or it won't look natural.

I'll have to think it through some more and try to be more on-task next time. I may have some photos lying around that I can at least try this technique out on. In the meantime, I do ok with just a single exposure that I apply a "virtual" graduated filter to, but I'm often stretching the foreground exposure to its limits.

Friday, May 7, 2010

Photographing Kids - Lighting

I know that a lot of you guys have found your way here through my wife's blog (thanks honey!), which means you probably have, or will soon have, kids, and would probably be interested in photographing them. You've also probably seen that Jess has taken some great photos of Logan and our family that she's posted to her blog. So to reward you for your support, I thought it might be fun to write some posts sharing some of her/our secrets for creating those images.

Rather than just list out every helpful tip I can think of, I thought I'd try and choose one topic at a time and explore it more fully.

I wanted to start with lighting. I think one of the best things you can do for your portrait photography is to be intentional about where you take your pictures and what kind of lighting you're going to find there.

What to Avoid
There are probably creative ways to make the lighting in any situation work for you. In general, though, try to avoid shooting in direct sun, especially during the middle of the day. Direct sun will make your kids squint, and will cast really harsh shadows on their face. If you're not intentional about your lighting, most of your shots will probably end up being in full sun.

Things to Try

Shoot in the shade
Your best bet is to shoot in some form of shade. A partly cloudy day, where there are some clouds covering the sun, is the most convenient source of light for this. You can shoot anywhere that's normally in full sun (which is most places), but the clouds will soften and diffuse the light. The below photo was probably taken on a partly cloudly or overcast day. You can see the light is really even and there are no harsh shadows.


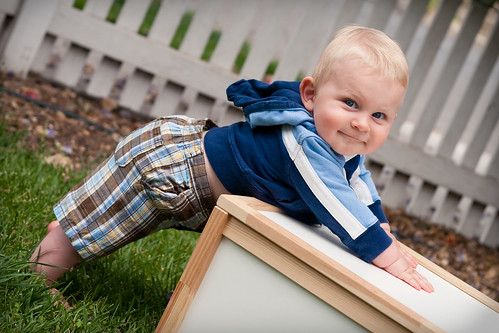
Tip: Shade and White Balance
White balance is an important part of portrait photography in general, but it's especially important when shooting in the shade. The light on a cloudy day, for example, will add a bluish cast to your photos. Use your camera's white balance settings to correct for this, or adjust the white balance in your editing software to warm up the photo.

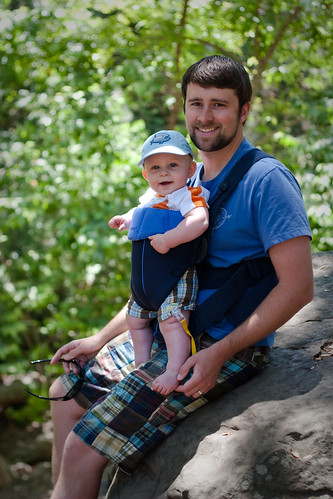
The other good source of diffused light is the shade of a tree. Some spots will provide full shade, but others often give you mottled light with small patches of shade and diffused light. In the below shot of me (with quite the mop growing on my head) and Logan, we're under shade from a tree and a shrub, and there are patches of light making their way in.

That's a very nice motorcycle helmet you've got there, Chris

I'm not completely sure what I think of patchy light versus perfectly-even light. I guess they're just different--patchy light may be less ideal for getting a clear and detailed capture of someone's face, but it seems to add some lightness and fun to the atmosphere of the portrait.

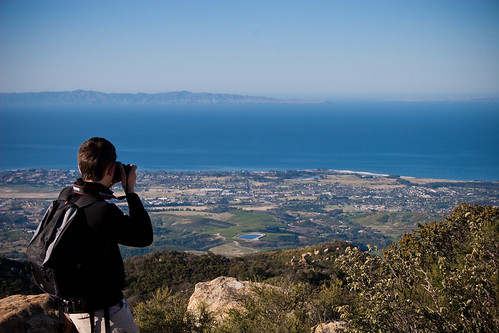
Pay attention to the edges of your shade
Something that can look pretty bad is having most of your image covered in shade, but large parts of it exposed to the sun. A mistake we've made a number of times is to shoot in the shadow cast by our house, but to include in the frame some of the yard or fence which is hit by full sun. This is especially bad because of the rigid outline of the house--the edge of the shadow becomes a very bold and distracting line.
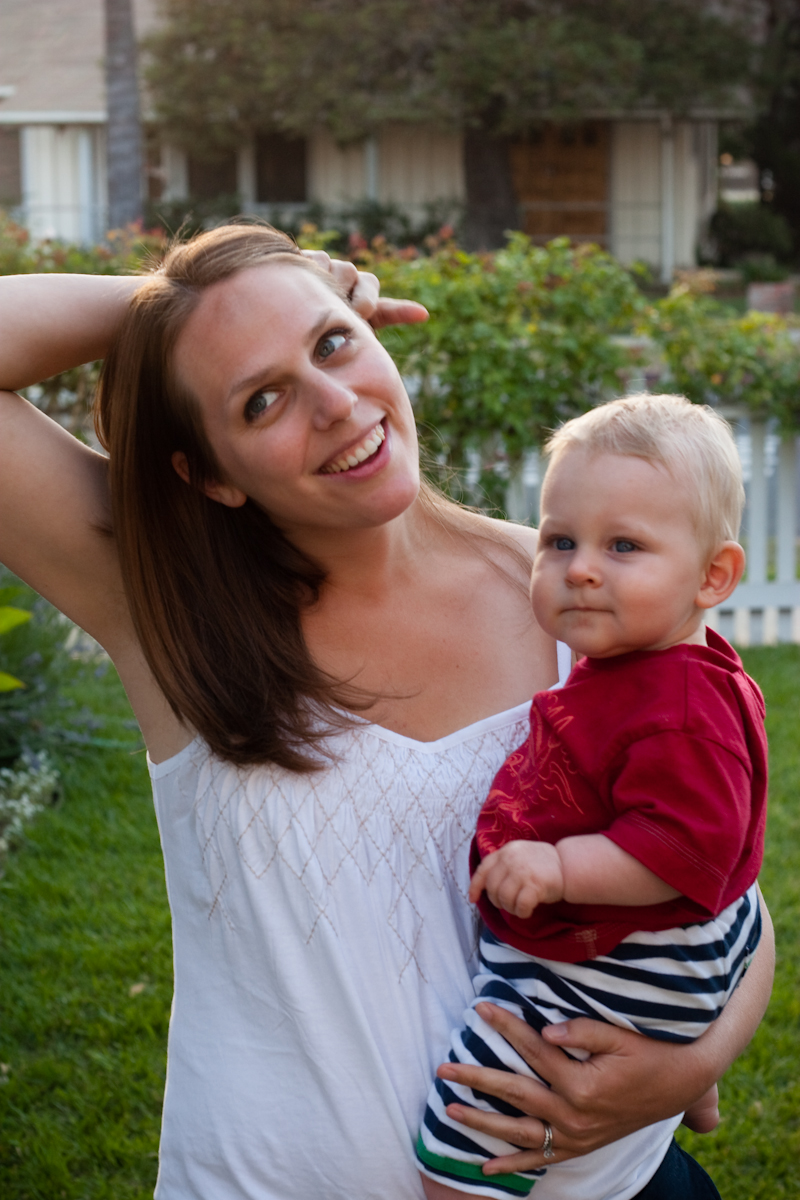


Back-lit subjects
You may think that a back-lit subject is hopeless, but back-lighting can actually be used to great effect. Try back-lit photos in the early morning or late afternoon when the sun is low in the sky and the light is soft.

Isn't she beautiful!? The little guy, too :)

There a number of things which make this whole back-lighting approach work well. One is that all of the light on your subject is being reflected off of other surfaces, so it's diffused and even. Another is that you will often end up over-exposing the background, which can help remove distractions and bring the focus to your subject. Finally, it can have a pretty cool effect on your subject's hair, producing a sort of golden halo around their face.

Our friends Sarah and Wyatt. Way to model back-lighting, guys!

The key to back-lighting is to exercise some control over the exposure. The background will often be very bright compared to the front of your subject. Your camera will take the average brightness of the scene and calculate an exposure based on that, but it will probably result in under-exposing your subject. Figure out how to use the exposure bias on your camera (even point-and-shoots have this feature!) and "over-expose" the shot by a stop or two.

Professionals will apply a technique called "spot-metering", where they change the metering mode of their camera, zoom in on the subject, press the shutter release half way and use that metering for the exposure settings. Jess and I are generally a little lazier, though. We just pick an amount to over-expose by (a somewhat-educated guess based on the lighting), try it and check the image on the LCD. You can usually tweak your exposure a little after-the-fact, too, in your editing program.

An interesting point for those of us living on the coast is that back lighting also tends to be about the only way to get a good picture at the beach (when there are no clouds in the sky). Jess and I notice this a lot in professional engagement photos at the beach. The sun is behind the couple, and the sky is completely blown-out (over-exposed) in order to get a good exposure of the subject.

Conclusion
I hope that helps some; have fun shooting your family and friends!


And if you take some pictures with some intentional light choices, be sure to share them in the comments below!