A little bit about what I've been up to, since I've apparently been MIA for quite a while.
Life's been busy, both with deadlines at work and with all the new joys and trials that our little baby has brought. I've been doing less photography, and I had begun to wonder if I might be losing my interest in it. I find, though, that I still jump at any opportunity to take an interesting photo (and whine a whole lot when I feel like I've missed one), so I'm convinced that I still love it as much as ever.
So rest assured that I haven't given up on our favorite hobby, and I'm still committed to sharing what I learn.
Fortunately, I think the subject matter of this blog is such that it doesn't have to be updated constantly for it to be interesting. I think I should have more time in the coming months, though, since we have less going on in the evenings during the summer.
Enough about schedules. Back to photography!
Thursday, May 21, 2009

Sunday, April 19, 2009
Meeting Another Photographer
On Saturday, I got to talk with another photographer at a small party. He's my friend's sister's husband, and I knew that he was a fellow software engineer, so I'd have something in common to talk with him about. I ended up finding out, though, that he's an avid photographer and has taken some great pictures.
It's rather sad that this is the case, but this was the first time that I have actually had the opportunity to talk with an experienced photographer. He seemed willing to share, so I had fun picking his brain for a good hour. My wife was with me and joined in on the fun.
I thought I'd briefly share some of his pearls of wisdom.
On studying composition and the work of other photographers, he had some interesting insight. He actually advised against spending too much time on Flickr, saying that Flickr will "rot your brain". Why? Because the photographers you like may not really be that good, and you'll end up emulating their mistakes. Instead, he recommended studying the works of master photographers. Maybe that's a little harsh on Flickr, but I imagine you can't go wrong studying the work of really great photographers. By the way, I don't know who any of these legends are. I recognize Ansel Adams and Michael Kenna, and that's really it. Anyway, I'm planning a trip to the library sometime this week to pick up some books--I figure I'll just browse a bit and find someone who's work I like.
He had some interesting things to say about maximizing the dynamic range of your camera. I don't fully understand what he told me yet, but he gave me enough to do my own research. He explained that digital cameras store much more detail in the highlights of the image than the shadows, and that RAW images have more detail in them (they distinguish between more shades), which is lost when converting to JPEG. So he always shoots in RAW, and when he really needs as much dynamic range as he can get (his example was photographing bright, snow-capped mountains in Alaska with dark forests at their feet) he plays a trick where he over-exposes the image by a stop and brings it back down when he processes it. Once I've understood this better, I'll post about it again with some links to articles and what not.
It was great talking to him, and I think it's motivated me more to get out and meet some other photographers. Maybe I'll try joining a photography club eventually here.
It's rather sad that this is the case, but this was the first time that I have actually had the opportunity to talk with an experienced photographer. He seemed willing to share, so I had fun picking his brain for a good hour. My wife was with me and joined in on the fun.
I thought I'd briefly share some of his pearls of wisdom.
On studying composition and the work of other photographers, he had some interesting insight. He actually advised against spending too much time on Flickr, saying that Flickr will "rot your brain". Why? Because the photographers you like may not really be that good, and you'll end up emulating their mistakes. Instead, he recommended studying the works of master photographers. Maybe that's a little harsh on Flickr, but I imagine you can't go wrong studying the work of really great photographers. By the way, I don't know who any of these legends are. I recognize Ansel Adams and Michael Kenna, and that's really it. Anyway, I'm planning a trip to the library sometime this week to pick up some books--I figure I'll just browse a bit and find someone who's work I like.
He had some interesting things to say about maximizing the dynamic range of your camera. I don't fully understand what he told me yet, but he gave me enough to do my own research. He explained that digital cameras store much more detail in the highlights of the image than the shadows, and that RAW images have more detail in them (they distinguish between more shades), which is lost when converting to JPEG. So he always shoots in RAW, and when he really needs as much dynamic range as he can get (his example was photographing bright, snow-capped mountains in Alaska with dark forests at their feet) he plays a trick where he over-exposes the image by a stop and brings it back down when he processes it. Once I've understood this better, I'll post about it again with some links to articles and what not.
It was great talking to him, and I think it's motivated me more to get out and meet some other photographers. Maybe I'll try joining a photography club eventually here.
Friday, April 17, 2009
Spring Time
With my finger broken, and work and life feeling really busy, I haven't been going on any serious photo outings. I've mostly just been doing some photography reading, and looking forward to the day when I have the time and energy to plan out a fun shoot.
I have managed to snap a few pictures here and there, though.
A couple weeks ago, I went out at lunch for a walk along the bluffs in Isla Vista near UCSB. I brought my camera knowing that the conditions probably wouldn't be too great--I was out in the harsh midday sun, and it was a pretty hazy day--but it had been so long since I had photographed anything that I decided to go out anyway.

A couple thoughts on this shot. First, I worked way too hard for this composition. What you don't see in this photo is that in between that fence and the path is actually a four-foot-thick wall of bushes and shrubs. I was literally standing in a bush, holding branches out of the way to get this.
Something I'm learning, and this isn't a very profound insight, is that if you're uncomfortable when you're framing the shot, it's a lot harder to compose it well. One part of your brain is saying "I dunno... I'm not sure this composition is really doing it for me. I should keep looking," while the other part's saying "Just press the shutter release, dammit! I can't take anymore of this bent knee, twisted torso position, with one hand holding back a branch and the other trying to keep the camera steady." The second voice usually gets louder and eventually wins out.
I was thinking a tripod might be a partial solution to this, since it would allow me to take a break without losing the framing I was considering. It would slow things down, though, to be adjusting the tripod all the time.
I'm hoping the other solution is to simply get better at composition with practice, and be able to find a good one before my patience wears out.
The other point to make is that this photo really demonstrates why sunrise and sunset are much better times for these kinds of photos. The harsh light on the flowers and leaves really doesn't do the scene justice.
I have managed to snap a few pictures here and there, though.
A couple weeks ago, I went out at lunch for a walk along the bluffs in Isla Vista near UCSB. I brought my camera knowing that the conditions probably wouldn't be too great--I was out in the harsh midday sun, and it was a pretty hazy day--but it had been so long since I had photographed anything that I decided to go out anyway.

A couple thoughts on this shot. First, I worked way too hard for this composition. What you don't see in this photo is that in between that fence and the path is actually a four-foot-thick wall of bushes and shrubs. I was literally standing in a bush, holding branches out of the way to get this.
Something I'm learning, and this isn't a very profound insight, is that if you're uncomfortable when you're framing the shot, it's a lot harder to compose it well. One part of your brain is saying "I dunno... I'm not sure this composition is really doing it for me. I should keep looking," while the other part's saying "Just press the shutter release, dammit! I can't take anymore of this bent knee, twisted torso position, with one hand holding back a branch and the other trying to keep the camera steady." The second voice usually gets louder and eventually wins out.
I was thinking a tripod might be a partial solution to this, since it would allow me to take a break without losing the framing I was considering. It would slow things down, though, to be adjusting the tripod all the time.
I'm hoping the other solution is to simply get better at composition with practice, and be able to find a good one before my patience wears out.
The other point to make is that this photo really demonstrates why sunrise and sunset are much better times for these kinds of photos. The harsh light on the flowers and leaves really doesn't do the scene justice.
-----------------------------------------------------
I'm proud to say that the front of our little house is surrounded by a white picket fence, with rose bushes planted all around. My wife puts a ton of effort into pruning the bushes back throughout the year, but when spring finally comes, the bushes explode.

It's fun to watch people walk down the street and stop to smell them, then keep walking only to turn back and smell them some more.

A little technical tip I used on this second photo--on the front of your SLR near the base of the lens is a "Depth-of-field Preview" button. On our Canon 20D it's unlabeled, it's just a button near the lens base. Check your manual if you can't find it. This button stops down your aperture to the actual aperture you've set in your exposure settings. You'll notice when you do this the image gets darker, but more of the photo will be in focus.
Normally when you look through your viewfinder the lens is at maximum aperture in order to let in as much light as possible for you to see the image. This means that the image you see through the view finder is not exactly what you'll get, and depending on your aperture setting the viewfinder will usually have less in focus than the actual image you capture.
I don't hear this camera feature mentioned much, so it may be that professional photographers don't consider it that valuable. You're probably just expected to have a feel for the depth of field you're going to get at each aperture.
In this case, however, I took advantage of it to get the right level of blur on those palm trees in the background. At maximum aperture, they were so blurry they were indiscernible. At too small of an aperture, though, the background would have become more in-focus than I wanted and it would have distracted from the flower.
I'm proud to say that the front of our little house is surrounded by a white picket fence, with rose bushes planted all around. My wife puts a ton of effort into pruning the bushes back throughout the year, but when spring finally comes, the bushes explode.

It's fun to watch people walk down the street and stop to smell them, then keep walking only to turn back and smell them some more.

A little technical tip I used on this second photo--on the front of your SLR near the base of the lens is a "Depth-of-field Preview" button. On our Canon 20D it's unlabeled, it's just a button near the lens base. Check your manual if you can't find it. This button stops down your aperture to the actual aperture you've set in your exposure settings. You'll notice when you do this the image gets darker, but more of the photo will be in focus.
Normally when you look through your viewfinder the lens is at maximum aperture in order to let in as much light as possible for you to see the image. This means that the image you see through the view finder is not exactly what you'll get, and depending on your aperture setting the viewfinder will usually have less in focus than the actual image you capture.
I don't hear this camera feature mentioned much, so it may be that professional photographers don't consider it that valuable. You're probably just expected to have a feel for the depth of field you're going to get at each aperture.
In this case, however, I took advantage of it to get the right level of blur on those palm trees in the background. At maximum aperture, they were so blurry they were indiscernible. At too small of an aperture, though, the background would have become more in-focus than I wanted and it would have distracted from the flower.
-----------------------------------------------------
My finger's pretty much healed now, and life seems to finally be slowing down a bit, so hopefully I'll be getting out for some more serious photography soon!
My finger's pretty much healed now, and life seems to finally be slowing down a bit, so hopefully I'll be getting out for some more serious photography soon!
Friday, April 3, 2009
Other Blogs For Learning Photography
It occurred to me recently that I would really enjoy reading some other blogs similar to my own. Specifically, blogs that go into detail about the process of creating the images.
So, I did a quick Google search for "learning photography blog", and after perusing the results and subsequently following some more links, I've found a few that I think I really like.

It only took a handful of posts for me to fall in love with this blog. According to his site, Art Wolfe is an experienced professional photographer with over 30 years of experience photographing "wildlife, landscapes, and native cultures". Take a look at the photos on his homepage. Wow.
It looks like he's hosted a number of photography television shows, and is currently doing a high-def one called "Travels to the Edge" that sounds like it'd be fun to watch.
A lot of his posts include nice videos. In this one, he provides a video explaining how he took one of his favorite photographs, and what he was thinking as he took it. He even shows you the "failed" exposures that lead up to his favorite one.
This post provides a quick but very cool Photoshop tip. I'd love to see more of these!
Digital Photography School

This site is a little overwhelming when you first visit it, but it becomes much more manageable if you simply view it by subscribing to it with an RSS reader (I use Google Reader).
It looks like a lot of the posts are actually articles submitted by different photographers. I found this one about taking outdoor portraits pretty informative.
I added a few more to my reader and I'll share them with you later if they turn out to be good reads.
The above two blogs are great because they provide great insight and advice from experienced photographers, but it would also be fun to read about someone's experiences more at my skill level. I imagine I'd feel a stronger sense of community with a photographer as equally amateur as myself. I'll have to keep looking!
So, I did a quick Google search for "learning photography blog", and after perusing the results and subsequently following some more links, I've found a few that I think I really like.

It looks like he's hosted a number of photography television shows, and is currently doing a high-def one called "Travels to the Edge" that sounds like it'd be fun to watch.
A lot of his posts include nice videos. In this one, he provides a video explaining how he took one of his favorite photographs, and what he was thinking as he took it. He even shows you the "failed" exposures that lead up to his favorite one.
This post provides a quick but very cool Photoshop tip. I'd love to see more of these!
Digital Photography School

This site is a little overwhelming when you first visit it, but it becomes much more manageable if you simply view it by subscribing to it with an RSS reader (I use Google Reader).
It looks like a lot of the posts are actually articles submitted by different photographers. I found this one about taking outdoor portraits pretty informative.
I added a few more to my reader and I'll share them with you later if they turn out to be good reads.
The above two blogs are great because they provide great insight and advice from experienced photographers, but it would also be fun to read about someone's experiences more at my skill level. I imagine I'd feel a stronger sense of community with a photographer as equally amateur as myself. I'll have to keep looking!
Thursday, March 26, 2009
Digital ND Filter
Remember the post where we talked about dynamic range? Landscape photographs, and particularly photos of sunrises and sunsets, tend to have problems with the dynamic range of the scene. You have the bright sun and clouds in the background, but some darker details in the foreground, and your camera can't always capture both.
For simple compositions with bright sky on top and dark foreground on bottom, the traditional solution is to put a "graduated ND (Neutral Density) filter" on your camera lens. These filters are dark on top and clear on bottom, with a little gradient in the middle to smooth the transition. They let in less light on the top so that you can expose for the foreground without losing details in the sky.
The same effect can also be achieved using some Photoshop wizardry.
I took this photo in front of "Lake" Lagunita behind Stanford soon after we got our camera.

The sky and clouds are really stunning, but the foreground of the image is too dark for you to make out any details.
To apply the digital ND effect, I followed this great tutorial, written for the GIMP (GNU Image Manipulation Program), an open source alternative to Photoshop. The tutorial was well written and easy to follow, so I'm not going to re-write all of the details here. I think my post here should be helpful, though, in seeing the major steps and the overall effect.
I haven't thrown down the dough yet for Photoshop, so the GIMP is a good alternative in the meantime. If you don't have Photoshop, I highly recommend downloading the GIMP. It's interface is very similar to Photoshop, so any concepts or techniques you learn with the GIMP will translate easily to Photoshop down the line.
This effect takes advantage of the fundamental editing concept of layers and layer masks. I didn't have a good handle on these concepts until working on this image, but now they make perfect sense. I think this filter technique is a really good way to solidify your understanding of layers and layer masks.
Think of layers as a stack of transparent slides. The final image you see is what you would see if look down at the top of the stack. The idea is that each slide, or layer, will contribute something different to the final image. Separating it into layers means that you can make different adjustments to different parts of the image. You then apply layer masks to control the transparency of different parts of each layer. In other words, the layer masks let you specify which part of each layer will contribute to the final image.
Even if you don't go through the whole tutorial, I recommend reading through the section in the beginning "About Layers and Layer Masks". He explains it well and has some great images to demonstrate the concepts.
For this technique, we're going to duplicate the image so that we have two layers. We'll adjust one layer to make the ground look good, and the other layer to make the sky look good. We'll then apply a layer mask so that the sky layer only contributes its sky and the ground layer only contributes its ground.
I first created a layer for the ground and adjusted it to bring out the details in the foreground. To lighten the foreground, I adjusted the midpoint slider in the levels tool. The midpoint slider is a good way to lighten or darken an image because it does it without clipping off any parts of the histogram, which would cause you to lose detail.

You can see why the graduated filter is necessary here; lightening the image made the foreground look better, but it washed out the sky.

Next I selected the sky layer to punch up the clouds a bit. I used the midpoint slider in levels again.
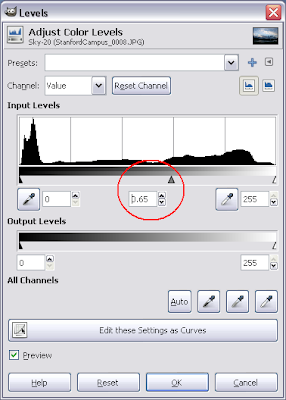
This made the sky look even more stunning, but made the foreground even darker.
Note that in order to see the sky layer, I had to unclick the eye icon next to the Foreground layer. Currently the Foreground layer is completely opaque, so unless I hide it I can't see anything from the layer below it.

Now that I have my foreground looking how I want in the Foreground layer, and the sky looking how I want it in the Sky layer, it's time to combine them using a layer mask.
You right click on the layer to add a layer mask to it. Select the layer mask in the layers palette, then use the gradient tool to actually create the mask. You create the gradient by drawing a line on the image.

This mask modifies the top layer so that everything above the beginning (top) of the line will be 100% transparent, and everything below the end (bottom) of the line will be 100% opaque. The gradient will be along the line itself to create a smooth transition between the images in the two layers.
If you hide the bottom layer, you can see the effect of the mask clearly. The checkered areas represent transparent parts of the upper layer.

Once you make both layers visible, you have your combined image!

Here's the original again for comparison:
And that's it! If you're new to Photoshop, I think this is a really good beginning technique. It's helped me get a good grasp on the basics of working with layers, and made me much more confident working with the GIMP in general.
For simple compositions with bright sky on top and dark foreground on bottom, the traditional solution is to put a "graduated ND (Neutral Density) filter" on your camera lens. These filters are dark on top and clear on bottom, with a little gradient in the middle to smooth the transition. They let in less light on the top so that you can expose for the foreground without losing details in the sky.
The same effect can also be achieved using some Photoshop wizardry.
I took this photo in front of "Lake" Lagunita behind Stanford soon after we got our camera.

The sky and clouds are really stunning, but the foreground of the image is too dark for you to make out any details.
To apply the digital ND effect, I followed this great tutorial, written for the GIMP (GNU Image Manipulation Program), an open source alternative to Photoshop. The tutorial was well written and easy to follow, so I'm not going to re-write all of the details here. I think my post here should be helpful, though, in seeing the major steps and the overall effect.
I haven't thrown down the dough yet for Photoshop, so the GIMP is a good alternative in the meantime. If you don't have Photoshop, I highly recommend downloading the GIMP. It's interface is very similar to Photoshop, so any concepts or techniques you learn with the GIMP will translate easily to Photoshop down the line.
This effect takes advantage of the fundamental editing concept of layers and layer masks. I didn't have a good handle on these concepts until working on this image, but now they make perfect sense. I think this filter technique is a really good way to solidify your understanding of layers and layer masks.
Think of layers as a stack of transparent slides. The final image you see is what you would see if look down at the top of the stack. The idea is that each slide, or layer, will contribute something different to the final image. Separating it into layers means that you can make different adjustments to different parts of the image. You then apply layer masks to control the transparency of different parts of each layer. In other words, the layer masks let you specify which part of each layer will contribute to the final image.
Even if you don't go through the whole tutorial, I recommend reading through the section in the beginning "About Layers and Layer Masks". He explains it well and has some great images to demonstrate the concepts.
For this technique, we're going to duplicate the image so that we have two layers. We'll adjust one layer to make the ground look good, and the other layer to make the sky look good. We'll then apply a layer mask so that the sky layer only contributes its sky and the ground layer only contributes its ground.
I first created a layer for the ground and adjusted it to bring out the details in the foreground. To lighten the foreground, I adjusted the midpoint slider in the levels tool. The midpoint slider is a good way to lighten or darken an image because it does it without clipping off any parts of the histogram, which would cause you to lose detail.

You can see why the graduated filter is necessary here; lightening the image made the foreground look better, but it washed out the sky.

Next I selected the sky layer to punch up the clouds a bit. I used the midpoint slider in levels again.

This made the sky look even more stunning, but made the foreground even darker.
Note that in order to see the sky layer, I had to unclick the eye icon next to the Foreground layer. Currently the Foreground layer is completely opaque, so unless I hide it I can't see anything from the layer below it.

Now that I have my foreground looking how I want in the Foreground layer, and the sky looking how I want it in the Sky layer, it's time to combine them using a layer mask.
You right click on the layer to add a layer mask to it. Select the layer mask in the layers palette, then use the gradient tool to actually create the mask. You create the gradient by drawing a line on the image.

This mask modifies the top layer so that everything above the beginning (top) of the line will be 100% transparent, and everything below the end (bottom) of the line will be 100% opaque. The gradient will be along the line itself to create a smooth transition between the images in the two layers.
If you hide the bottom layer, you can see the effect of the mask clearly. The checkered areas represent transparent parts of the upper layer.

Once you make both layers visible, you have your combined image!
Here's the original again for comparison:
And that's it! If you're new to Photoshop, I think this is a really good beginning technique. It's helped me get a good grasp on the basics of working with layers, and made me much more confident working with the GIMP in general.
Wednesday, March 25, 2009
Ouch
So a little bad news. Remember the wood chopping pic? Well, two weekends ago I set out to chop the last handful of logs in the pile, and on the first log, I missed the wedge and kind of squished my finger in between the sledge hammer's handle and the top of the wedge. It wasn't too terrible, but I did fracture it and it's been in a splint since then.
You know the finger you use to press your camera's shutter release? Yeah, it was that one (right index). So that's why I've been MIA for a while. The doctor said the splint should hopefully be off in a week or two, though.
I can't shoot anything, but I can still use a mouse! A broken finger tends to slow you down, so I haven't had as much time for photography stuff, but I have been sharpening my Photoshop skills a bit. I'll show you what I've been learning in my next post!
You know the finger you use to press your camera's shutter release? Yeah, it was that one (right index). So that's why I've been MIA for a while. The doctor said the splint should hopefully be off in a week or two, though.
I can't shoot anything, but I can still use a mouse! A broken finger tends to slow you down, so I haven't had as much time for photography stuff, but I have been sharpening my Photoshop skills a bit. I'll show you what I've been learning in my next post!
Tuesday, March 10, 2009
Goleta Beach
A week ago Friday I went out for another early morning photoshoot, this time out at Goleta Beach. I wanted to actually capture the sunrise this time, so I got up at 5:30am to try and get there a little before 6:00 (the sunrise that morning was at 6:20).
This post has taken me a long time! I've spent a lot of time agonizing over the pictures I took. There were really only one or two that I was excited about and I put a lot of effort into trying to edit the other decent photos into something interesting.
I found it really challenging to take a good landscape shot of the sunrise. I've talked to BurnBlue a couple times through e-mail, and he's given me some good advice on landscapes. In all of his shots, he tries to have something in the foreground, midground, and background. With beach shots, the foreground is typically some interesting rocks, and the background is the sky. I'm less sure of what constitues the midground, but I'm guessing that's the ocean. I think this advice makes a lot of sense--without subjects on these different planes, the picture looks flat and doesn't draw you in.
Thinking back to the shots I took, I'm not sure what I could have used as a good foreground, so perhaps that was part of my problem. I think this was the most interesting landscape shot I took, and that's probably because it has some interesting things up front: the car and the tree's silhouette.

I've probably spent the most time playing with this photo--trying different things with the colors, trying different crops. I think the problem with it is that there's too much going on. In a way there are two photos here. There's a nice photo of a car looking out to sea, and there's a photo of a beatiful tree silhouette. Having both subjects seems like too much.
I did actually take a photo of just the car, but I think it's basically pointed the wrong direction--it's on the right looking into land rather than on the left looking out to sea.
I tried something new on this photo, I used the graduated tint effect in Picasa to punch up the blue in the sky. It took me a few tries to get something nice that I didn't later decide looked overdone.
The photo I was most excited about was this one of a water spigot on the pier. I loved the light and shadows on the rough metal, and I had fun trying to capture the water drop mid-flight.


This post has taken me a long time! I've spent a lot of time agonizing over the pictures I took. There were really only one or two that I was excited about and I put a lot of effort into trying to edit the other decent photos into something interesting.
I found it really challenging to take a good landscape shot of the sunrise. I've talked to BurnBlue a couple times through e-mail, and he's given me some good advice on landscapes. In all of his shots, he tries to have something in the foreground, midground, and background. With beach shots, the foreground is typically some interesting rocks, and the background is the sky. I'm less sure of what constitues the midground, but I'm guessing that's the ocean. I think this advice makes a lot of sense--without subjects on these different planes, the picture looks flat and doesn't draw you in.
Thinking back to the shots I took, I'm not sure what I could have used as a good foreground, so perhaps that was part of my problem. I think this was the most interesting landscape shot I took, and that's probably because it has some interesting things up front: the car and the tree's silhouette.

I've probably spent the most time playing with this photo--trying different things with the colors, trying different crops. I think the problem with it is that there's too much going on. In a way there are two photos here. There's a nice photo of a car looking out to sea, and there's a photo of a beatiful tree silhouette. Having both subjects seems like too much.
I did actually take a photo of just the car, but I think it's basically pointed the wrong direction--it's on the right looking into land rather than on the left looking out to sea.
I tried something new on this photo, I used the graduated tint effect in Picasa to punch up the blue in the sky. It took me a few tries to get something nice that I didn't later decide looked overdone.
The photo I was most excited about was this one of a water spigot on the pier. I loved the light and shadows on the rough metal, and I had fun trying to capture the water drop mid-flight.
Check out the detail on that drop!

I think I've learned a valuable lesson from my frustration this past week. My editing skills are limited, and I was taking some shots that weren't that great to begin with and then trying to salvage them by applying techniques that I haven't mastered. Really, I should have just picked the photos that excited me (in this case just the one), and been ok with letting the rest go. It was valuable to try and self-critique these other photos to learn what I could do better next time, but trying to edit them into something good was just discouraging and exhausting.
-------------------------------------------------
There were a couple other fun stories from the weekend that I wanted to share.
After taking pictures at Goleta Beach, I went over to a friend's place to go jogging before work. He took me out along the coast to a part of Goleta I haven't really seen before. While we were out, we saw a whale a little ways off shore, blowing water and splashing around. We came across a couple researchers whose job it was to sit out on the bluffs from 9-5 everyday and monitor whale activity in the Santa Barbara Channel. They told us it was actually three grey whales out there mating (apparently it's not uncommon for two males to mate with a female)--I think they said it was around the peak of mating season. Sadly, I'm not in the habit of carrying my camera bag while jogging, so no pictures. Cool way to start the day, though!
The next day (Saturday), we went out to Santa Claus beach (perhaps it's so named to-highlight the irony of being able to go play at the beach on Christmas day?). While we were there, a handful of paragliders and one hangglider landed at the beach.


These crazy guys run off the mountains behind Santa Barbara with their chutes, float around for a while and eventually make their way down to land at the beach. I think the guy in these pictures actually botched his landing--he landed back in the shrubs between the train tracks and the beach. I'm assuming he didn't intend to do that because something about landing within thirty feet of a train with a big chute floating above you doesn't seem very safe.
Subscribe to:
Posts (Atom)
