Wednesday, December 22, 2010

Butterfly Beach Sunset


This was from a pretty spectacular sunset back in November that I had a tough time figuring out how to shoot.

Early on, the clouds were exploding with some amazing color, but they were all overhead rather than out over the ocean.

Instead, I spent most of my time focused on the moon, hanging low in the sky (and looking huge, though I've learned this is just an illusion!). There were also some colors to the sky itself that I don't think I've seen before--the sky was actually teal close to the horizon, as you can see here.

I've been trying to work on managing the contrast available in my images. Here, I pushed the highlights to bring out contrast in the clouds and in the reflection of the moon on the water. I kept the rocks in the foreground purposefully pretty dark in hopes of bringing more attention to the reflection from the moon.

Here is the unedited original.

Saturday, December 4, 2010

Three Friends


.5 seconds at f/5.6 and 17mm


I definitely went through some Photoshop heroics to pull this one together.

I blended separate images for the foreground and sky--the range of the scene was too big to capture in a single exposure. After some editing, there's about a 3.5 stop difference between foreground and sky.

There's some barrel distortion here, so the horizon is ever-so-slightly curved. This meant I couldn't use a simple gradient to blend the exposures. Instead, I created a selection of the sky and used the Select -> Refine Edge tool to blur the edge, then created a layer mask from the selection. Good Photoshop practice!

One issue I ran into, though, was that I made a crop and then continued to make a bunch of other edits. I'm used to being able to go back and tweak the crop in Lightroom, but in Photoshop it seems to be permanent. Any suggestions anyone? I guess I should have waited till the end to crop!

The original, unedited foreground and sky.

Tuesday, November 23, 2010

Point Mugu


I met another photographer recently who was a student at Brooks in Santa Barbara and has been shooting around the area for a while.

With a favorable "partly cloudy" weather report, we drove 45 minutes down the coast to a spot called Point Mugu for some sunset seascape photography. The sky looked great as we left Santa Barbara, but got progressively worse as we drove farther south :).

The clouds never ended up breaking, but it was still a great time.

Santa Barbara has mostly sandy beaches, and doesn't have this kind of dramatic meeting of jagged rock and violent waves. So just being there and watching the waves crash was awesome.

Getting to shoot with a much more experienced photographer was a lot fun--I pummeled him with questions the whole drive down, and it was interesting to watch someone else work. Probably the best part, though, is getting to compare results and see a different perspective on the scene. Have a look at his image!

Friday, November 19, 2010

Let's shed a little more light...


1/2 sec. at f/8.0 and 200mm

This is the same spider from the last image, taken on the same night. I wasn't sure if my exercise in "ambiguity and delay" was going that well, so I decided to try a more traditional approach in case my experiment didn't pan out.

Both were taken at night, with the only light coming from a street light across the way. For this one, I actually grabbed a halogen work light from the garage and lit him up :)

The best part is that this guy is still out there, in the same spot, almost three weeks later! I've actually discovered the particular leaf that he hides behind during the day, and I've been checking on him periodically. It's supposed to rain a lot this weekend, though, so I'm curious to see if that does him in.

If he's still around, I may tear his web down and try and get a timelapse of him creating a new one. We'll see...

Saturday, October 30, 2010

Happy Halloween!


I've been reading an awesome book on composition and design in photography called The Photographer's Eye by Michael Freeman. There were two concepts I learned about recently that I tried to apply in this photo: "ambiguity" and "delay".

Ambiguity is simply where the image isn't obvious and straightforward, and is "slower to read". One of Freeman's examples was to focus on a subject's shadow rather than the subject itself. The viewer becomes more involved in the photograph when they have to complete it. "In a sense, it is like hearing a clever joke--just understanding the point is rewarding."

Delay is a closely related subject that I thought was really cool. The idea is that you hide an important part of the image by applying design techniques to draw the viewer's eye to other places first. Delay is essentially how you create ambiguity in your image.

When I saw this huge spider on the side of our house, and then its shadow, it seemed like a great opportunity to apply these concepts. I've tried to enhance the contrast on the rose as much as possible to make it "pop" and grab your eye first. Hopefully your eye moves next to the shadow of the spider, which gets your imagination working about the creepy critter. Finally, further scanning the frame should reveal the spider itself, though it's camoflaged and out of focus.

My biggest regret here is that the background is pretty confusing--the shadows of the leaves are a mess and I have to imagine it's hard to make out here that you're looking at the side of a house. You'll have to let me know if you think it worked!

Friday, October 1, 2010

Lightning


Anyone else enjoy the lightning last night?

I set the camera on the tripod on our back porch / landing, set up a 30 second exposure, then locked the cable release. It fired away while I went and put Logan to bed :).

I caught maybe fifteen strikes, this was one of the best (most of them didn't show much of a bolt). This is a single exposure, but I can't testify to whether or not there were multiple strikes in it.

This is from downtown Santa Barbara, looking out towards Hendry's beach. The view from here is great for figuring out whether there will be a good sunset at the beach :).

Here's another one. This one is three separate exposures merged in Photoshop.

Tuesday, September 28, 2010

There's Still Hope


This photo outing was encouraging for a number of reasons.

First, the EF-S 17-55mm proved once again to be a fantastic lens, and I'm really pleased with how big of a difference it's making in the sharpness of my images.

Second, it was pretty painless to edit, and only took me about 30 minutes of tinkering, so I'm definitely building confidence there.

Finally, I dragged the whole family with me, including the ~2 year old and the ~2 month old, and it wasn't impossible to make that happen. We piled in the car just before sunset, drove up the road a bit, and spent about a half hour at the beach, and nobody was too upset about it.

Basically, I was able to pull together an image that I'm really excited about without having to make a huge investment. It was reassuring to see that there's still hope for me in this hobby, even with two young kids and precious little free time! :)

Friday, September 17, 2010

Isla Vista Steps


This photo was taken last December on one of my all-time-favorite photo outings.

Isla Vista is a tiny town which is home to most of the college students attending UC Santa Barbara. The town butts right up against some small cliffs along the ocean. When the tide's at its peak, the beach along IV is completely submerged, and the waves crash against the cliffs. On one end of the town are these steps which lead down to the beach and are submerged at very high tide.

It had been raining for days, and was supposed to keep raining that morning. Packing the night before, I grabbed a rain coat and an umbrella in case it was still going. The clouds broke, though, and made for quite the sunrise.

We had recently purchased a Flip video camera, and I took it along to share the experience a little bit. Check out the video below.

Tuesday, July 20, 2010

Lighthouse


The coast guard has a small lighthouse on the cliffs on the mesa. I think it's more like a small rotating spotlight than a lighthouse, but I don't know what else you'd call it. It sits on a piece of property owned by the coast guard which includes about eight homes occupied by coast gaurd members, half of which have unobstructed views of the ocean. Not a bad deal!

This was a couple hours after sunset with a mostly full moon shining behind me. It's a three minute exposure, and the lighthouse light was rotating, so that's why the starburst is a little funky.

This was shot from Thousand Steps, and was one of my first outings with our new EF-S 17-55mm f/2.8 IS lens. I'm very pleased with how sharp it turned out!

The original, unedited image.

Saturday, July 10, 2010

Tide's Coming In...


A couple weekends ago my mother-in-law was in town to help Jess around the house and with Logan, so I had some more flexibility than usual for photography. To take advantage of the situation, I rented my current dream lens, the EF-S 10-22mm, for the weekend.

The lens was great--very sharp, and I really appreciated the extra wide field of view.

I'm excited with the results from this outing, though not necessarily about the images themselves. There wasn't any color in the sky, so the images are missing that drama that I love. I'm excited, though, because I think I finally nailed the exposure in terms of balancing the foreground and the sky while still getting the water effect that I was after. Now I just need to wait for a dramatic sunrise or sunset to come along, and I should be golden!

The original, unedited image.

Also, here are some more details / notes that I posted in the comments:

A couple notes on the exposure:
- I shot in full manual
- I zoomed in on the rock and metered off of the foreground, which ended up being about +2 stops overexposed for the whole scene.
- I experimented with different shutter speeds, from about 1/4sec to maybe 1sec.
- I occasionally took a 0ev exposure to capture the sky in case I wanted to blend it in. Turned out to be unnecessary in this case; I just used a virtual grad filter in Lightroom to bring down the exposure of the sky.
- I shot in RAW, then I sent the saturation through the roof in Lightroom.

Finally, I picked a rock that was mostly out of the water, waited for a wave to hit, and then started the exposure just about as the water hit the rock. I experimented with starting the exposure at different points there, too. You can never really predict what the water's going to do or what it will look like, so experimentation seems key :)

Tuesday, June 29, 2010

Chris


My brother Matt braved the mosquitos with me for some night photography on the beach in Galveston, Texas.

It ended up being too dark for the kinds of shots I had in mind--there was only a partial moon and it was hiding behind clouds--so we decided to mess around with some light painting instead. We used a AA maglite and took turns running in, trying to write our name, then running out and waiting for the 60 second exposure to finish. We had about 8 failed attempts before I finally got this one--the trick ended up being to write slowly, and move in between each letter.

After that, we decided we couldn't tolerate any more mosquito bites (despite copious amounts of bug spray! I even got a bite or two through my t-shirt!), and headed back in before Matt had a chance to redeem himself :)

There seem to be frequent thunderstorms in Galveston, and I had hoped to catch one while we were there, but wasn't lucky enough. Had fun hanging out with my brother, though!

The original unedited image.

Thursday, June 24, 2010

Harbor Under Fog


One last image from my harbor outing back in May.

As I was heading back to the car, the fog was starting to roll over the harbor in broken chunks. The moving breaks in the fog created the nice gradation of light you see in this image.

Also, the white balance was a big key in editing these photos. Most of the light sources in this shot, particularly the light from Santa Barbara illuminating the glow in the sky, are very orange. If you look at the original image with auto white balance, it's overwhelmingly orange.

I shot these in RAW and brought the color temperature way down to turn the orange glow into a cool blue. The original white balance is probably much truer to what my eyes saw that night, but I think the blue just has a much better atmosphere.

I've learned that the white balance can have a huge impact on your night photography. If your images are coming back with an orangish-brown sky, try bringing down the color temperature and--poof!--you'll have a blue night sky. (Or, when you're out there, try shooting with your camera's "tungsten" white balance mode).

The original, unedited image.

Another image from that evening. I didn't like how it turned out enough to put it at the front of my photostream, but I thought it was at least a cool idea.


Sunday, June 20, 2010

Saturate your Sunsets!

I made an interesting discovery today that's left me feeling a little cheated. As Jess and I have felt our way through editing over the past five years, one thing we've learned is that you have to be careful with saturation. It's great to have your colors "pop", but you can easily overdo it--the colors start to bleed and you start losing detail and variation of tone. So, as a sort of rule, I never push the saturation very far, in either my photographs of people or my landscapes. I'm realizing that was a mistake, at least for my sunset shots.

This past week I started to create a Flickr gallery of seascape images that inspire me so that I can spend some time pulling them apart and learning from them. One of the things I've realized so far is that a lot of the great sunsets on Flickr are heavily saturated, and it's even pretty clear that detail has been lost in the sky for the sake of emphasizing those dramatic colors.

So I grabbed one of my recent photos, and pushed the saturation slider farther. It looked pretty good! So I pushed it farther. Even better! I pushed it all the way to +100, and it looked awesome.

Check out the before and after. The 'before' is how it looked when I originally posted it last week. I had boosted the saturation some, but only to about +23. Also, since I was spending some more time on it today, I tweaked the exposure some and brought up the foreground--so look at the difference in the sky more than the difference in the water and sand.


Move your mouse over the image to see the change

I can't believe that something so simple has eluded me for so long!

One thing that may be worth noting is that I always shoot in RAW format, and this may have been important in allowing me to push the saturation so far. We always shoot RAW because Lightroom makes it so easy--it's essentially transparent to us that the images are RAW and not JPEG.

I'm looking forward to sharing more about the Flick gallery when it's finished. I think the other thing that's become very apparent already from assessing others' work is that my shots are underexposed. I've got to fix that next time I go out!

Friday, June 18, 2010

Stormy Sunset


Another one from my outing to Hendry's back in April.

In hindsight, it would have been nice to have kept the shutter speed the same, but overexpose it by a stop or two to get the foreground exposed better. It's hard to know exactly what shutter speed is going to look best when you're out there. I am learning, though, that I have to overexpose it some to get the foreground right, and then I can pull the sky back down in post processing.

I did bracket this exposure, and blended in some of the overexposed image to recover detail in the rock. The water only looked this cool in this exposure, though, so the rock was all I could take from the other one.

Here's the original, unedited image. It's so off-level that you'd think I was drunk! This was one of my last outings with the $30 tripod before I got the new one, so that's probably what happened there. It needed to be cropped in anyway!

Wednesday, June 16, 2010

Everything's Bigger In Texas


This was taken on Galveston island in Texas at a place called Pointe West. I was looking inland, across the bay towards Houston.

That cloud is huge. it's probably over 25,000 feet tall--taller than any mountain and probably more massive. You'll never see anything like that in Santa Barbara :). Check out the original size for some nice detail in the clouds.

This is a panorama, stitched together from 5 vertical frames at 17mm.

Here is the original, uncropped and unedited panorama.

Saturday, June 12, 2010

Harbor at Night


Another shot from my outing to the harbor back in May.

This is the Santa Barbara harbor at night, viewed from the breakwater. At the left of the frame is the yacht club, and the brightest lights in the middle are the SB City College stadium.

There were so many different sources and colors of light in this scene, I think that's what excited me most about it.

The atmosphere of these harbor shots is coming from a layer of fog over Santa Barbara--that's what's producing the glow along the horizon.

The original, unedited image.

Wednesday, June 9, 2010

Huge Beetle


Jess was out pruning the roses and came across this monster beetle hanging on to one of the stems.

Here's a less interesting, but more informative photo of the thing that I buried in my photostream:


This photo is a good example of how you can get a decent "macro" shot with your kit lens. The focal length of the lens doesn't affect the minimum focusing distance, so you can focus as close as possible then zoom all the way in to 55mm and get pretty good magnification. I wrote my very first blog post in 2009 about this subject, and interestingly enough it's by far my biggest source of traffic.

If you agitated this guy, he'd buzz something in front of his mouth and make a chirping sound; here's a little clip of it.


Here's the original, unedited image.

Wednesday, May 26, 2010

The Lizard That Swallowed The Sea


My friend Wyatt and I headed up to Lizard's Mouth on Saturday morning. Sunrise was ridiculously early, so we didn't get up there until about an hour after. So the light was decent, but not amazing. It was a really clear day, though, with a beautiful view of the city and the islands.

This was shot from a pretty similar perspective to this image, with a different focal length obviously. I was probably standing on the next rock over :).

Lizard's mouth is a great spot. It's almost a shame, though, how easy it is to get to. I think Wyatt and I were both feeling like we would have enjoyed more of a hike that morning.

This is a handheld 3 exposure HDR at -1 1/3ev, 0ev, and +1 1/3ev. Here is the original, unedited, 0ev exposure


Throw a photographer into any scene and it instantly gains some interest for me. Thanks for livening up my image, Wyatt :)

The view from Lizard's Mouth on a clear day like this one is fantastic. This is overlooking Goleta; Wyatt's standing in front of the view of the airport, and the UCSB campus is to the left of his head. The big island on the horizon is Santa Cruz Island.

I tried a panorama from up there but totally botched it. Good thing I lugged my tripod out with me :). Maybe another time.

The original, unedited image.

Tuesday, May 25, 2010

Harbor at Night

I'm changing things up a bit with how I share photos on this blog. Basically, I've decided that Flickr is a better place for me to try and develop community and share my work (after all, that's what it's designed for!), so I'm planning to put my primary focus there.

That said, I know that my blog (and the fact that you can subscribe to it) is how most of my "real life" friends get to see my work, so, I'll continue to post all of my photos here, and the descriptions will just be identical to whatever I write on Flickr.

Also, I'm still very passionate about sharing what I learn about photography, and I think this blog is still the best medium for lengthy discussions of a given topic. So it will continue to be more than just a clone of my Flickr photostream. If I write an 'article' on the blog, I'll just link to it in the description of one of the photos on Flickr.

Up until now the role of my photostream versus my blog has been a little fuzzy, and I'd often write slightly different things in each place, and occasionally link the Flickr photo back to the blog post. I'm hoping this will clean things up.

If you follow my work on Flickr, you can just follow it there and you won't miss anything. If you follow my blog, you can just follow my blog and you still won't miss anything that way, either.

So, to get things started, here are a couple recent photos with their descriptions from my photostream.

This was my first outing with my new tripod--a set of Manfrotto 055XPROB legs and a PhotoClam PC-33NS ballhead. Up until now I've been making do with a really cheap ($30?) tripod that came bundled with a camcorder.

It turned out the biggest benefit I saw with the new tripod had to do with composition. Because the legs are so tall, I can stand up very comfortably while looking through the viewfinder. I see now, too, why ballheads are the preferred choice for landscapes--the ballhead made it very easy to adjust the framing. All of that added up to me being able to be a lot more patient in getting the scene composed well.

The fact that I can trust my camera on it enough to step away during a 2 minute exposure is nice, too. :)

Another shot from the harbor that night. I really liked the light on the inside of the sea wall.

Just upgraded to a Flickr Pro account today, woohoo!

Friday, May 14, 2010

Thousand Steps

8 sec at f/16 and 18mm

Towards the end of the day on Wednesday there were some really cool clouds in the sky, it looked promising for a sunset. I checked the tide tables and saw that there was a really high tide right at sunset, the tide was just over 5 feet. When the tide is that high, there are a lot of places around Santa Barbara where the beach completely disappears and the waves crash against the cliffs. A fun side effect of this is that some of these beaches have stairs that lead down to them, and with that tide height the stairs lead straight into the waves.

There's a set of stairs nearby called Thousand Steps (it is a lot of steps, but the name is an exaggeration--there's nowhere close to a thousand) that I've been wanting to shoot under these conditions.

This was a nice quick trip; I already had a clear idea of the shot I wanted, and there weren't many other options to try. I got there, set up, took a handful of shots, and was out of there pretty quickly.

This was one of my first outings with my new tripod--Manfrotto 055XPROB legs with a PhotoClam PC-33NS ball head. I'll gush about this tripod more in another post, but I have to say the biggest benefit I'm finding with it is that it makes is much easier to compose my shots. I'm able to comfortably and patiently assess the composition and make fine adjustments to it. With my old, cheap tripod, I'd tend to give up a bit because of the painful difficulty of getting it positioned just right.

One of the things I've learned about recently, which was relevant on this outing, is the problem of "barrel distortion". I had read this term a number of times, but never bothered to look it up until recently. Barrel distortion is a problem with wide-angle lenses which causes the scene to bend slightly away from the center at the lens's widest angle.

This becomes a problem when you have a clean, straight horizon in your shot, as it will appear curved. The solution is to not shoot at the absolute widest angle of the lens if your scene has a strong horizon line.

I took my first photos at 18mm, my kit lens's shortest focal length. With the image preview on the back of my camera, I zoomed in and saw this curve on the horizon.


It's clearer when the horizon is right up against the frame.


Not so bad, really, but I ended up deciding on a square cropping of just the stairs anyway. I really liked the texture of the water in the first picture and wanted to bring the focus to that and the stairs.

Wednesday, May 12, 2010

Sunset at Hendry's

.8 sec at 18mm, f/16, and ISO 100

This was a great trip, I came back with a ton of exciting photos that will probably take me months to process. This was one of the best.

The trip was also made extra awesome by a special companion.

Logan and dad at Hendry's beach

I've found it really hard over the past year to be flexible enough to make it to the beach when the sunset is looking promising. Things have gotten a little more relaxed lately, though, (now that "sunset season" in Santa Barbara is over!) and I think I should be able to steal away from time to time for some sunset photography. One idea Jess had suggested was for me to try bringing Logan along, since he's old enough now to have a little fun at the beach. Initially I was worried that it wouldn't work because I'd never have enough time to set up a shot before I had to pick up the camera and chase after him. He can't really get into much trouble out there, though, so I think it could actually work in general.

It turned out to be kind of a terrible day to bring him... It was really cold and windy, and the tide was pretty high. I bundled him up as best I could, and I ended up setting him down on some rocks in a little alcove (you can see it on the right side of the photo) that mostly kept him protected from the wind. Someone probably would have called child protective services on me if they saw us, but the beach was completely cleared out by the weather :)

You're a trooper buddy!

Editing this one was rough. It was a promising photo so the stakes were high, and I kept second-guessing myself. I knew that I had to get it done in one sitting (or else I'd let it sit "almost done" forever!), so I brewed some tea, put some music on, and cranked away for a good two hours straight. Below are the before and after.


I'm still trying to perfect the technique for this type of photo. A lot of photographers use graduated filters on their lenses in order to expose for the foreground without blowing out the sky. Filters can be expensive, though, and the horizon is rarely a straight line all the way across (for example, the cliffs to the right in this one), so my hope has been to use clever editing to pull it off.

In theory, I want one exposure where the foreground is well-exposed and the water is how I want it, and then I want a second exposure where the sky is exposed well, and I can blend those together. I've yet to pull this off, though. I think a big part of it is just that I get too excited when I'm out there and don't give the technique enough thought. The other problem is that the sky and foreground can't be too far apart in exposure or it won't look natural.

I'll have to think it through some more and try to be more on-task next time. I may have some photos lying around that I can at least try this technique out on. In the meantime, I do ok with just a single exposure that I apply a "virtual" graduated filter to, but I'm often stretching the foreground exposure to its limits.

Friday, May 7, 2010

Photographing Kids - Lighting

I know that a lot of you guys have found your way here through my wife's blog (thanks honey!), which means you probably have, or will soon have, kids, and would probably be interested in photographing them. You've also probably seen that Jess has taken some great photos of Logan and our family that she's posted to her blog. So to reward you for your support, I thought it might be fun to write some posts sharing some of her/our secrets for creating those images.

Rather than just list out every helpful tip I can think of, I thought I'd try and choose one topic at a time and explore it more fully.

I wanted to start with lighting. I think one of the best things you can do for your portrait photography is to be intentional about where you take your pictures and what kind of lighting you're going to find there.

What to Avoid
There are probably creative ways to make the lighting in any situation work for you. In general, though, try to avoid shooting in direct sun, especially during the middle of the day. Direct sun will make your kids squint, and will cast really harsh shadows on their face. If you're not intentional about your lighting, most of your shots will probably end up being in full sun.

Things to Try

Shoot in the shade
Your best bet is to shoot in some form of shade. A partly cloudy day, where there are some clouds covering the sun, is the most convenient source of light for this. You can shoot anywhere that's normally in full sun (which is most places), but the clouds will soften and diffuse the light. The below photo was probably taken on a partly cloudly or overcast day. You can see the light is really even and there are no harsh shadows.


Tip: Shade and White Balance
White balance is an important part of portrait photography in general, but it's especially important when shooting in the shade. The light on a cloudy day, for example, will add a bluish cast to your photos. Use your camera's white balance settings to correct for this, or adjust the white balance in your editing software to warm up the photo.

The other good source of diffused light is the shade of a tree. Some spots will provide full shade, but others often give you mottled light with small patches of shade and diffused light. In the below shot of me (with quite the mop growing on my head) and Logan, we're under shade from a tree and a shrub, and there are patches of light making their way in.

That's a very nice motorcycle helmet you've got there, Chris

I'm not completely sure what I think of patchy light versus perfectly-even light. I guess they're just different--patchy light may be less ideal for getting a clear and detailed capture of someone's face, but it seems to add some lightness and fun to the atmosphere of the portrait.

Pay attention to the edges of your shade
Something that can look pretty bad is having most of your image covered in shade, but large parts of it exposed to the sun. A mistake we've made a number of times is to shoot in the shadow cast by our house, but to include in the frame some of the yard or fence which is hit by full sun. This is especially bad because of the rigid outline of the house--the edge of the shadow becomes a very bold and distracting line.


Back-lit subjects
You may think that a back-lit subject is hopeless, but back-lighting can actually be used to great effect. Try back-lit photos in the early morning or late afternoon when the sun is low in the sky and the light is soft.

Isn't she beautiful!? The little guy, too :)

There a number of things which make this whole back-lighting approach work well. One is that all of the light on your subject is being reflected off of other surfaces, so it's diffused and even. Another is that you will often end up over-exposing the background, which can help remove distractions and bring the focus to your subject. Finally, it can have a pretty cool effect on your subject's hair, producing a sort of golden halo around their face.

Our friends Sarah and Wyatt. Way to model back-lighting, guys!

The key to back-lighting is to exercise some control over the exposure. The background will often be very bright compared to the front of your subject. Your camera will take the average brightness of the scene and calculate an exposure based on that, but it will probably result in under-exposing your subject. Figure out how to use the exposure bias on your camera (even point-and-shoots have this feature!) and "over-expose" the shot by a stop or two.

Professionals will apply a technique called "spot-metering", where they change the metering mode of their camera, zoom in on the subject, press the shutter release half way and use that metering for the exposure settings. Jess and I are generally a little lazier, though. We just pick an amount to over-expose by (a somewhat-educated guess based on the lighting), try it and check the image on the LCD. You can usually tweak your exposure a little after-the-fact, too, in your editing program.

An interesting point for those of us living on the coast is that back lighting also tends to be about the only way to get a good picture at the beach (when there are no clouds in the sky). Jess and I notice this a lot in professional engagement photos at the beach. The sun is behind the couple, and the sky is completely blown-out (over-exposed) in order to get a good exposure of the subject.

Conclusion
I hope that helps some; have fun shooting your family and friends!


And if you take some pictures with some intentional light choices, be sure to share them in the comments below!

Friday, April 30, 2010

Deep Rock

200mm at f/10

Lightroom offers some awesome features for managing and organizing your photographic work. I imagine it's less ideal for managing snapshots from your vacations or parties, but it's great when you use it for organizing your "portfolio" of artistic work.

Lately, the number of photos I have sitting around waiting to be processed has gotten out of control. I've also been perusing some older photo shoots and finding some hidden gems. All of this has lead me to put some thought towards finding a way to keep track of all these photos that I'd like to "eventually process".

One of the tools available in Lightroom is the ability to apply a color label to each of your photos. I've decided to label all of my "published" photos (that is, photos I've uploaded and shared) blue, and to label all of my photos that I think merit some future attention yellow. I can then easily filter my entire library for yellow photos, and when I feel in the mood, I can pick one or two to process and share.

I mentioned I've found some older photos that looked promising. I think what happened with these is that there was some creativity in the composition, but the light, color, contrast, or whatever didn't work out and they didn't look that great straight off the camera. Now that I'm more confident in my editing skills, though, I can play some tricks to highlight the good elements of these images and make use of them.

Also, the more I learn about design and composition, the more interested I've become in the photos where the composition is more of the focus than the actual material--basically, I've started to have a greater appreciation for my more abstract images.

The image at the top of this post is of a rock in the San Francisco Bay. It was taken in 2006 from the Golden Gate bridge with a long zoom lens. I like the perspective--I think the overhead view makes me feel like I'm hovering above it about to fall into the bay [shudder].

It was middday and the rock was pretty harshly lit, and it's also covered in bird poop and dead grass. Overall, the face of the rock was just a distracting mess. I used a Lightroom preset here called "Cold Tone", which I think had a great effect in creating a simpler, almost monochromatic image with a mysterious vibe.

Friday, April 23, 2010

Sensor Dust

Scenic photography seems to be plagued by sensor dust. It shows up most visibly against skies and clouds and when the lens is set to a small aperture, which it often is when you're shooting a landscape and want a large depth of field.

Take a look at this photo from my last post. This is the output straight from the HDR step. The HDR process "enhances detail" and so it tends to worsen these dust spots.


Here's a zoomed-in look at an especially bad part of the sky. Yuck!


It's not the end of the world, though. Even basic editors like Picasa have tools for removing dust spots. So the next step for me is to go in and heal all of these nasty little spots. Sometimes they can be tough to spot; I find that it helps to drag the photo around--your eye seems to notice them better when the picture moves.

Here's a screenshot from Lightroom showing all the places I had to remove dust. What a pain!


So what do you do about it? Well, many of you probably have newer camera bodies which have some automatic sensor cleaning and "dust-delete" technology built in. Our 20D does not, though, so I just constantly gripe about it and say to myself all the time "man, I really need to clean my sensor sometime!".

I'm finally getting around to cleaning it, and I thought I'd share the experience with you as well as record some notes for myself for future cleanings.

For starters, cleaning your sensor sucks. It's difficult, scary, and not very cheap. I haven't been perfectly happy with my results, either. The first time I did it, a little fiber managed to make its way into some part of the viewfinder and I haven't been able to get it out. So, with that cheery outlook...

Test shot
The first step is to take a test shot that clearly shows all of the dust on your sensor. Do this with a long focal length (I used our 50mm f/1.8 lens), the lowest ISO (100 for me), and the smallest possible aperture. Focus at infinity and take a picture of a blue sky or an evenly-lit, light colored wall. With these settings, it will probably be a really long exposure, but don't worry about it. Motion blur doesn't affect the dust particles on the sensor, and could even help by blurring out any unwanted detail in the wall.

Here's my initial test shot of a cream-colored wall.



You can zoom in on this photo and spot the dust. To really highlight the dust, though, bring the photo into Photoshop or the GIMP.

Go to Image->Levels Adjustment and adjust the levels to create some crazy contrast. Bring the black and white sliders all the way into the edges of the histogram, like so:


This should get you a crazy looking photo that really accentuates the grossness. The color can be distracting, so at this point I turn it to grayscale. Here's the same test shot with those adjustments:
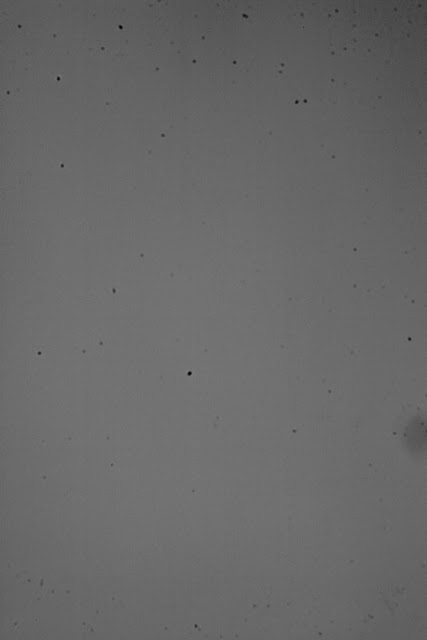


Now you have a baseline and you can try different cleaning techniques and see how much they improved things.

Cleaning the sensor
I find that anyone who says anything online about cleaning a camera sensor always adds a scary disclaimer to avoid any liability. So here's mine: do not treat this post as instructions for cleaning your sensor. If it reads like instructions, it's because I'm writing them to myself for cleaning my sensor, not for you to clean yours.

First off, you need an environment to work in that's as dust free as possible. I've read suggestions to use a tiled bathroom or kitchen with the windows closed.

Our home was built in 1928 and the weatherproofing is hopeless. The first time I cleaned my sensor, I did it in our bathroom, and I literally watched a few dust particles fall into the camera body. This time around, I did it in my cube at work at the end of the day--definitely a pretty sterile environment, provided I cleaned off part of my desk.

You'll need a tripod to hold the camera while you work.


There are a variety of methods for actually cleaning your sensor. There are two that I've been using: a blower and sensor swabs.

I start with the blower. I use the tripod to point the camera at an angle downward to encourage dust to fall out and discourage dust from falling in. Your camera should have a function for locking the mirror up and out of the way so that you can get to the sensor. Mine is labeled "Sensor clean." and is one of the very last menu options. On the 20D, this locks up the mirror until you power off the camera.

The first step, then, is to lock the mirror up and use a few forceful blasts of air to try and blow dust off the sensor. I did this and took another test shot; here's the before and after comparison.


It's hard to tell with the small images side by side, but this did make a difference. Still pretty bad overall, though.

The next step is the sensor swabs. At this point, unfortunately, I don't really remember the research that went into choosing a brand of swabs and cleaner. If I remember correctly, I picked both the blower and the swabs up from a local camera store because they weren't any cheaper online. Also, I went with an off-brand sensor swab.

Using the swabs has never gone that well for me. The instructions are to apply the solution to the swab, then wipe in one direction across the sensor, then the other direction using the opposite side of the swab. I think this means that you should only have to put the swab in and out of the camera once, since you're basically wiping one way then wiping back the other.

I find the edges of the sensor to be the hardest part. After swabbing and taking a test shot, I ended up with what looked like some moisture residue along one edge of the sensor, plus a fairly large fiber. I decided to go in for a second swab, and it didn't get much better. I got rid of the fiber, but a couple large spots showed up in the middle, and the residue was still there along the edge.
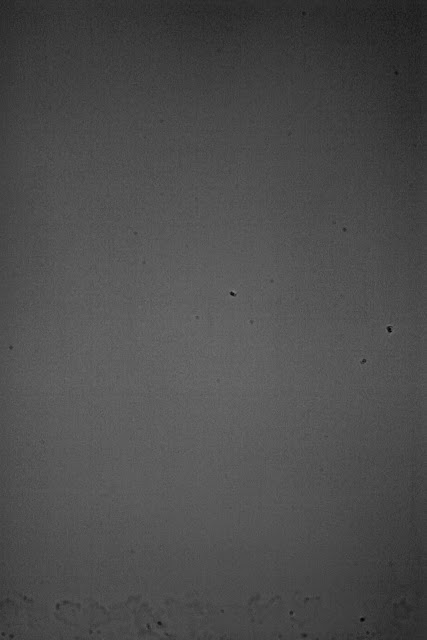


Unfortunately that's pretty much where I left it. I tried a few more blasts of air but no luck. I've done a little more reading since then and found some other techniques to try. There's a relatively cheap "sensor pen" that looks promising. I have such a tough time with the swabs and the edges; the pen seems like it would be a lot easier to use.

In the meantime, I guess I'll just keep doing spot removal when I process the images!

There are a lot of articles out there on sensor cleaning, so I'd suggest reading up before you try it. Here's one that I read this time around which had some helpful tips.

Good luck!